
Building a Three Tier AWS Architecture with Terraform From Scratch
I wanted to stop consuming Terraform modules and start writing them. The best way I know how to learn something is to build something real, break it, fix it, and understand why it works. So I sat down and built a full three tier AWS architecture from scratch, no copy paste, no AI, just me, the Terraform docs, and a lot of errors. Here is what I ended up with and what I learned along the way.
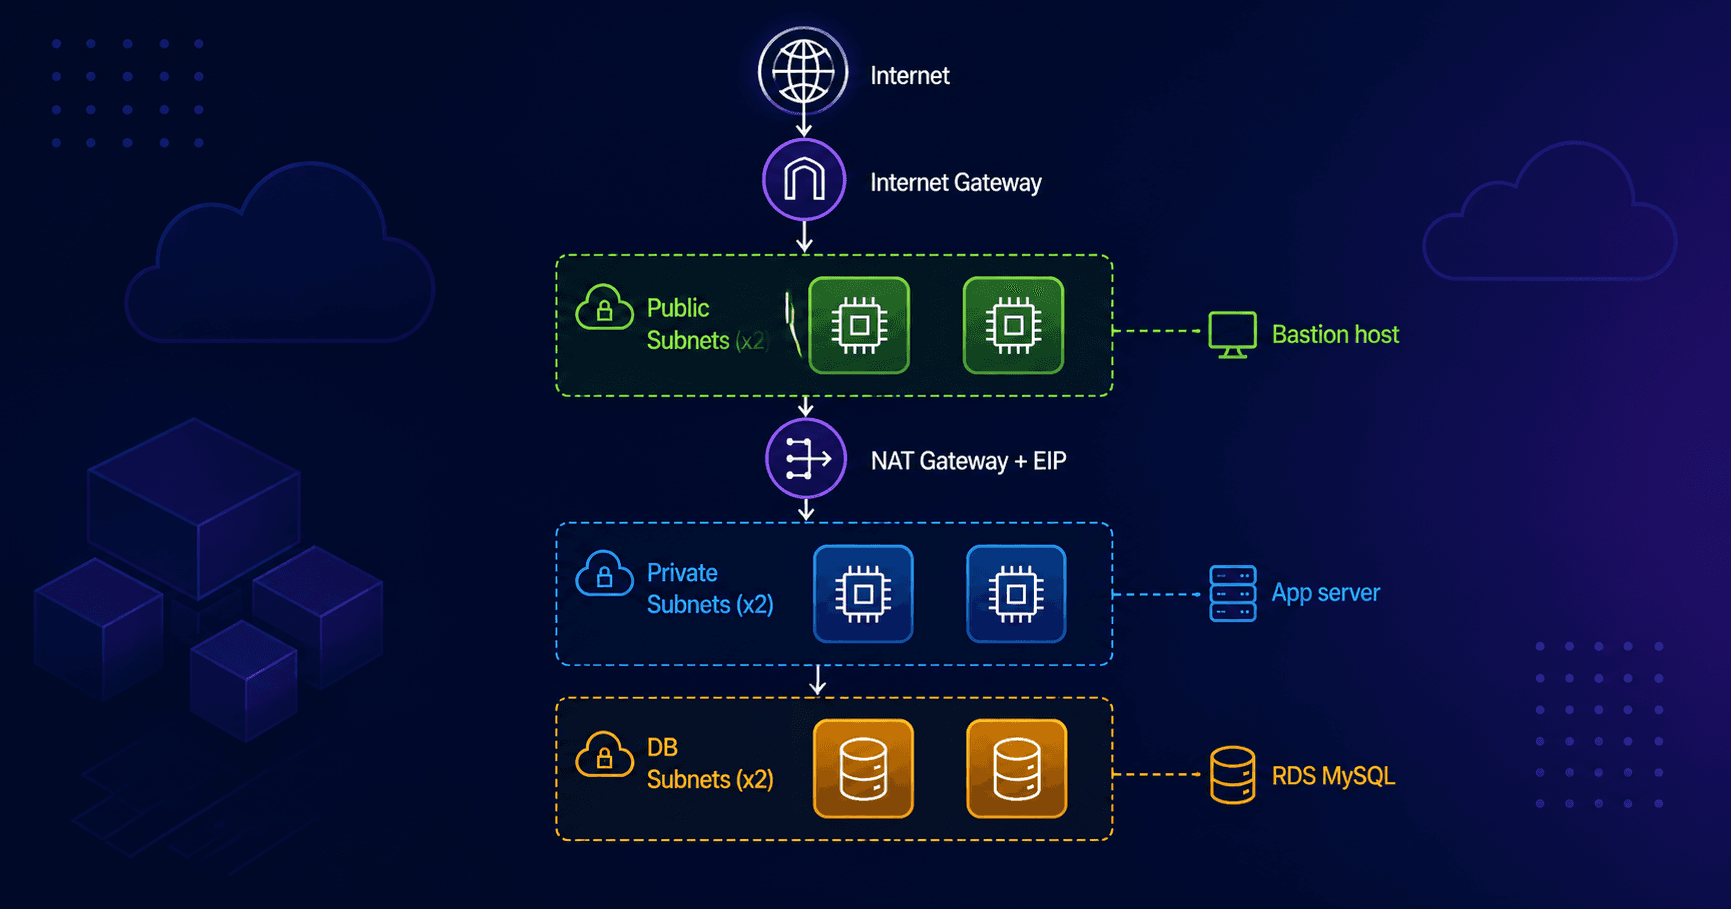
The Architecture
Internet
    |
Internet Gateway
    |
Public Subnets (x2)   -- Bastion host
    |
NAT Gateway + EIP
    |
Private Subnets (x2)  -- App server
    |
DB Subnets (x2)       -- RDS MySQL
Three tiers. Each isolated from the other. Traffic only flows where I explicitly allowed it.
The whole thing lives in a single VPC with a CIDR block of 10.0.0.0/16, spread across two availability zones for redundancy.
Understanding CIDR Before Writing Anything
Before I touched a single resource, I had to get CIDR blocks straight in my head. The concept is simpler than it looks.
A CIDR block is just an IP address plus how many bits are fixed.
10.0.0.0/16  -->  first 16 bits fixed  -->  65,536 IPs  (the whole VPC)
10.0.1.0/24  -->  first 24 bits fixed  -->  256 IPs     (a subnet)
10.0.1.5/32  -->  all 32 bits fixed    -->  1 IP         (a single machine)
Think of /16 as the whole building and /24 as individual floors. I used these CIDRs throughout:
VPC:              10.0.0.0/16
Public subnet 1:  10.0.1.0/24
Public subnet 2:  10.0.2.0/24
Private subnet 1: 10.0.3.0/24
Private subnet 2: 10.0.4.0/24
DB subnet 1:      10.0.5.0/24
DB subnet 2:      10.0.6.0/24
File Structure
I kept everything flat in one folder. No modules yet. The goal was to understand what every resource does before abstracting anything away.
three-tier/
├── main.tf
├── variables.tf
├── outputs.tf
└── terraform.tfvars
Step 1: The VPC
resource "aws_vpc" "main" {
  cidr_block           = "10.0.0.0/16"

  tags = {
    Name = "main_vpc"
  }
}
AWS enables DNS support by default on a VPC. You only need to set it explicitly if you are overriding defaults or want to make your config self documenting.
Step 2: Internet Gateway
resource "aws_internet_gateway" "main_internet_gateway" {
  vpc_id = aws_vpc.main.id

  tags = {
    Name = "main_gateway"
  }
}
The IGW is what connects your VPC to the internet. Without it, nothing in your VPC can reach the outside world and nothing outside can reach in.
Step 3: Subnets
Six subnets total, two per tier, each in a different AZ.
resource "aws_subnet" "main_subnet_public_1" {
  vpc_id            = aws_vpc.main.id
  cidr_block        = "10.0.1.0/24"
  availability_zone = "us-east-2a"

  tags = {
    Name = "main_subnet_public_1"
  }
}
I repeated this pattern for all six subnets, alternating between us-east-2a and us-east-2b.
One mistake I made: I initially did not set availability_zone explicitly on my DB subnets. AWS put both of them in the same AZ and RDS refused to create the subnet group because it requires coverage across at least two AZs. The error was clear once I read it properly.
Step 4: NAT Gateway and Elastic IP
This is where things got interesting. Private subnets have no route to the internet, but your app servers still need to reach out, to download packages, call APIs, pull updates. The NAT Gateway handles this.
It sits in a public subnet and acts as a middleman:
Private EC2 --> NAT Gateway (public subnet) --> IGW --> Internet
The NAT Gateway needs a fixed public IP so that response traffic knows where to come back to. That is what the Elastic IP is for.
resource "aws_eip" "main_elastic_ip" {
  domain = "vpc"

  tags = {
    Name = "main_eip"
  }
}

resource "aws_nat_gateway" "main_nat_gateway" {
  allocation_id = aws_eip.main_elastic_ip.id
  subnet_id     = aws_subnet.main_subnet_public_1.id

  tags = {
    Name = "main_nat_gateway"
  }
}
AWS charges for Elastic IPs because public IPv4 addresses are genuinely scarce. As of February 2024 they charge for all public IPv4, even ones in use. Always destroy resources when you are done learning.
Step 5: Route Tables
A route table is a list of rules that says: for this destination, send traffic here. They are outbound only. Inbound rules live in security groups and NACLs.
resource "aws_route_table" "main_public_route_table" {
  vpc_id = aws_vpc.main.id

  route {
    cidr_block = "0.0.0.0/0"
    gateway_id = aws_internet_gateway.main_internet_gateway.id
  }

  tags = {
    Name = "main_public_route_table"
  }
}

resource "aws_route_table" "main_private_route_table" {
  vpc_id = aws_vpc.main.id

  route {
    cidr_block     = "0.0.0.0/0"
    nat_gateway_id = aws_nat_gateway.main_nat_gateway.id
  }

  tags = {
    Name = "main_private_route_table"
  }
}
The difference between public and private is literally one line. gateway_id points to the IGW, nat_gateway_id points to NAT. That single change is what makes a subnet public or private.
0.0.0.0/0 means everything. AWS automatically adds a local route for your VPC CIDR so internal traffic stays internal. The 0.0.0.0/0 catches everything else.
Step 6: Route Table Associations
Creating a route table does nothing on its own. You have to associate it with subnets. Think of the route table as a sign that says "internet this way" and the association as physically putting that sign in a neighbourhood.
resource "aws_route_table_association" "public_1" {
  subnet_id      = aws_subnet.main_subnet_public_1.id
  route_table_id = aws_route_table.main_public_route_table.id
}

resource "aws_route_table_association" "public_2" {
  subnet_id      = aws_subnet.main_subnet_public_2.id
  route_table_id = aws_route_table.main_public_route_table.id
}

resource "aws_route_table_association" "private_1" {
  subnet_id      = aws_subnet.main_subnet_private_1.id
  route_table_id = aws_route_table.main_private_route_table.id
}

resource "aws_route_table_association" "private_2" {
  subnet_id      = aws_subnet.main_subnet_private_2.id
  route_table_id = aws_route_table.main_private_route_table.id
}
Two public subnets share the same public route table. Two private subnets share the same private route table. One association per subnet, four total.
Step 7: Security Groups
Three security groups: one for the bastion, one for the app server, one for RDS. Each only allows traffic from the tier directly above it.
I used the newer aws_vpc_security_group_ingress_rule resource instead of inline ingress blocks. The key difference: cidr_ipv4 takes a string, not a list. I hit this error:
Inappropriate value for attribute "cidr_ipv4": string required, but have tuple.
The fix was removing the square brackets.
resource "aws_security_group" "bastion_sg" {
  vpc_id = aws_vpc.main.id
  name   = "bastion_sg"

  tags = {
    Name = "bastion_sg"
  }
}

resource "aws_vpc_security_group_ingress_rule" "bastion_sg_ingress" {
  security_group_id = aws_security_group.bastion_sg.id
  from_port         = 22
  to_port           = 22
  ip_protocol       = "tcp"
  cidr_ipv4         = "YOUR_IP/32"
}

resource "aws_vpc_security_group_egress_rule" "bastion_sg_egress" {
  security_group_id = aws_security_group.bastion_sg.id
  ip_protocol       = "-1"
  cidr_ipv4         = "0.0.0.0/0"
}
For the app server security group, instead of a CIDR block as the source, I referenced the bastion security group ID directly. This is more secure than IP based rules because it scopes access to anything running inside the bastion SG specifically.
resource "aws_vpc_security_group_ingress_rule" "app_sg_ingress" {
  security_group_id            = aws_security_group.app_sg.id
  from_port                    = 22
  to_port                      = 22
  ip_protocol                  = "tcp"
  referenced_security_group_id = aws_security_group.bastion_sg.id
}
Same pattern for db_sg, but the source is app_sg and the port is 3306 for MySQL.
Step 8: Key Pair and Bastion EC2
I generated a fresh key pair locally rather than creating one in the console:
ssh-keygen -t rsa -b 4096 -f ~/.ssh/bastion-key
This creates two files. The private key stays on my computer. The public key gets uploaded to AWS via Terraform:
resource "aws_key_pair" "bastion_key" {
  key_name   = "bastion-key"
  public_key = file("~/.ssh/bastion-key.pub")
}
The bastion EC2 goes into the public subnet with a public IP:
resource "aws_instance" "bastion_host" {
  ami                         = "ami-0278a2977150e13fc"
  instance_type               = "t3.micro"
  subnet_id                   = aws_subnet.main_subnet_public_1.id
  vpc_security_group_ids      = [aws_security_group.bastion_sg.id]
  key_name                    = aws_key_pair.bastion_key.key_name
  associate_public_ip_address = true

  tags = {
    Name = "bastion_host"
  }
}
One thing to note: in a custom VPC you must use vpc_security_group_ids, not security_groups. The latter only works in the default VPC.
Step 9: App Server in Private Subnet
Same as bastion but no public IP, different subnet, and app_sg:
resource "aws_instance" "app_server" {
  ami                    = "ami-0278a2977150e13fc"
  instance_type          = "t3.micro"
  subnet_id              = aws_subnet.main_subnet_private_1.id
  vpc_security_group_ids = [aws_security_group.app_sg.id]
  key_name               = aws_key_pair.bastion_key.key_name

  tags = {
    Name = "app_server"
  }
}
Step 10: RDS in DB Subnet
First, a subnet group that tells RDS which subnets it can use:
resource "aws_db_subnet_group" "db_group" {
  name       = "db_subnet_group"
  subnet_ids = [aws_subnet.main_subnet_db_1.id, aws_subnet.main_subnet_db_2.id]

  tags = {
    Name = "db_subnet_group"
  }
}
Then the RDS instance:
resource "aws_db_instance" "default" {
  allocated_storage      = 10
  db_name                = "mydb"
  engine                 = "mysql"
  engine_version         = "8.0"
  instance_class         = "db.t3.micro"
  username               = "admin"
  password               = "Admin1234!"
  db_subnet_group_name   = aws_db_subnet_group.db_group.name
  vpc_security_group_ids = [aws_security_group.db_sg.id]
  skip_final_snapshot    = true

  tags = {
    Name = "db_private"
  }
}
RDS takes around five to ten minutes to provision. Be patient.
The SSH Jump Pattern
The whole point of a bastion is that you never SSH directly to your private instances from the internet. You SSH to the bastion first, then jump to the private instance from there.
The catch is your private key lives on your computer, not on the bastion. SSH agent forwarding solves this:
ssh-add ~/.ssh/bastion-key
ssh -A -i ~/.ssh/bastion-key ec2-user@<bastion-public-ip>
The -A flag forwards your local SSH agent through the connection. When you then SSH from the bastion to the app server, it reaches back to your laptop's agent to authenticate. Your private key never actually leaves your machine.
From inside the bastion:
ssh ec2-user@<app-server-private-ip>
From inside the app server, install the MySQL client and connect to RDS:
sudo dnf install mariadb105 -y
mysql -h <rds-endpoint> -u admin -p
When that MySQL prompt appears, the whole architecture is proven end to end.
Mistakes I Made
A few real errors I hit that are worth knowing about:
Forgot availability_zone on DB subnets. AWS put both in the same AZ. RDS requires at least two AZs for a subnet group. The error message told me exactly what to fix.
Passed a list to cidr_ipv4. That attribute takes a plain string. No square brackets.
Why Separate DB Subnets
I questioned this myself. You could technically put RDS in the private subnets with the app servers. But separating them gives you an extra boundary.
Private subnets have a NAT route so app servers can reach the internet to download packages. DB subnets have no route table at all. Not just firewalled. Literally no route exists to anywhere outside the VPC. Your database cannot initiate any outbound connection even if someone tried to make it.
Public  = can talk to internet (via IGW)
Private = can reach internet outbound (via NAT)
DB      = isolated, talks to nobody except what you explicitly allow
What Is Next
This flat main.tf works but it is getting long. The next step is refactoring into modules, one for networking, one for compute, one for database. I also want to add:
Variables and outputs so nothing is hardcoded
An Application Load Balancer in front of the app servers
An Auto Scaling Group to replace the single EC2
Remote state in S3 with DynamoDB locking
If you are learning Terraform, I would recommend doing exactly this. Write everything flat first. Understand what every resource does. Then refactor. Modules make a lot more sense when you have something messy to clean up.